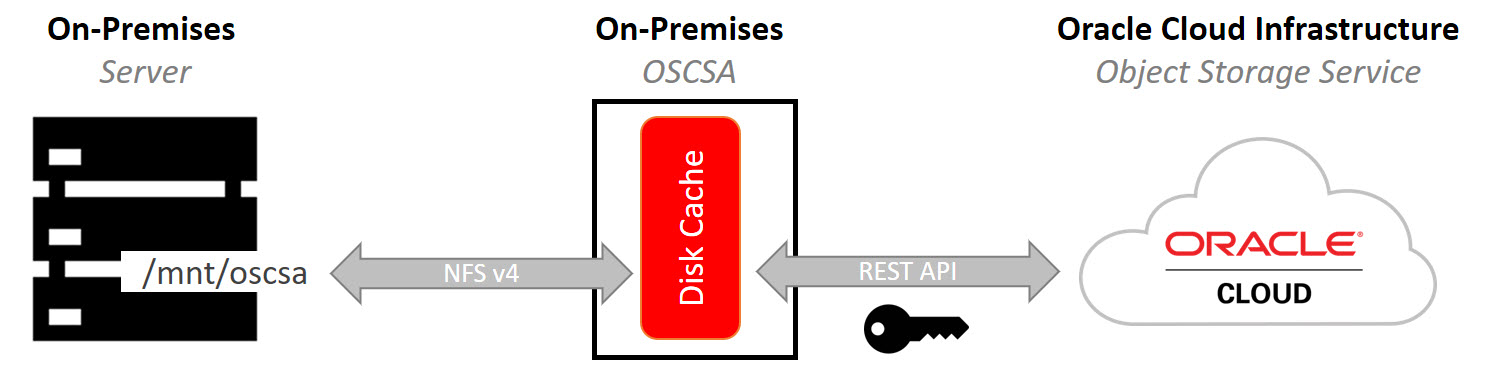
The Oracle Cloud Infrastructure Storage Software Appliance – also known as Oracle Storage Cloud Software Appliance OSCSA – acts as a gateway between classic storage and the Oracle Cloud Infrastructure Object Storage Service. The appliance can be installed on an on-premises Linux system or in an Oracle Compute Cloud machine and runs in a Docker container. It offers a local cache where clients can place their files before the OSCSA moves them into the Storage Service. The communication between a client with a filesystem to the OSCSA works with NFSv4, from the OSCSA to the Object Storage Service, Oracle is using their REST interface. Traffic from the OSCSA to and from the Oracle cloud can be encrypted and compressed.
In this blog post first I will show you how you can install and configure the OSCSA in an on-premises environment. In a second step I configure an on-premises database server which uses the Object Storage Service as Oracle RMAN backup location.
Key Features
- Compression and Exncryption
- File Versioning
- End-to-end Data Integrity with Checksum Verification
- Support for Data Archival (Oracle Storage Archive Class)
- Pin files to the appliance cache for faster access
Where to get the OSCSA and more Information
- Download: Oracle Cloud Infrastructure Storage Software Appliance Downloads
- PDF: Using Oracle Cloud Infrastructure Storage Software Appliance
- Doc: Using Oracle Cloud Infrastructure Storage Software Appliance
- Doc: Oracle Learning Library – Backing Up Data Using Oracle Storage Cloud Software Appliance
- Doc: Software Appliance Storage Pricing
Requirements
- Two dual-core CPUs (4-core CPUs recommended)
- Minimum memory requirements (based on the maximum number of files that can be uploaded to the appliance filesystem):
- 16 GB for filesystems up to 1 million files
- 32 GB for filesystems up to 5 million files
- 64 GB for filesystems up to 10 million file
- Minimum disk size required to install Docker: 10 GB
- Oracle Linux 7 with UEK Release 4 or later
- Docker 1.12.6
- NFS version 4.0
The installation and configuration of the required Oracle Linux components OL7 with UEK4, Docker and NFS is very well described in the “Using Oracle…” guide. Please take a look in the guide, it’s straight forward. The OSCSA installer does not start when the requirements are not fullfilled.
My Test Environment
| OSCSA | breitenbach.martinberger.local | Oracle Linux 7.4 | 100GB Storage |
| Database Server | zuchwil.martinberger.local | Oracle Linux 7.4 | Oracle RDBMS 12.1.0.2 |
| Traditional Cloud Account | cloud.oracle.com | Zone EM2 |
Firewall
Port 32771 (Appliance Web Interface) , 32772 (NFS) and 32773 (REST) have to be opened on the appliance machine. If you don’t want to use these port numbers, you can set them during the installation process. Execute as user root:
# firewall-cmd --permanent --zone=public --add-port=32771/tcp
# firewall-cmd --permanent --zone=public --add-port=32772/tcp
# firewall-cmd --permanent --zone=public --add-port=32772/tcp
# firewall-cmd --reload
File Content
All installation steps are executed as OS user root. The Oracle Storage Cloud Software Appliance Software Release 16.3.1.3 is available on my local machine in folder /stage. The extracted OSCSA file contains a file called OSCSA_GATEWAY_README.txt where you can get more information about the installation and configuration possibilities like proxy etc.
# tar xvfz oscsa-OnPrem-16.3.1.3.0.tar.gz
./
./oscsa_gw:1.3.0.tar
./oscsa
./oscsa-install.sh
./oscsa-config.sh
./helper-install-oscsa.sh
./oscsaOSCSA_GATEWAY_README.txt-control.sh
./
./OSCSA_RELEASE_NOTES.txt
Installation
The installation starts by executing oscsa-install.sh. I have added the parameter -a = advanced so I am able to set ports for NFS, Administrative Web Interface and REST. Oracle recommends for the cache storage a minimal size. I have ignored that for my test environment.
# ./oscsa-install.sh -a
Checking that docker is installed and using the correct version
Pass found docker version Docker version 17.06.2-ol, build d02b7ab

*************************************
Checking host prerequisites
*************************************

Detected linux operating system
Checking kernel version
Pass kernel version 4.1.12-94.3.9.el7uek.x86_64 found
Checking NFS version
Pass found NFS version 4

*************************************
All prerequisites have been met
*************************************


*************************************
Begin install
*************************************

Enter the install location press enter for default (/opt/oscsa_gateway/) :

Installing to destination /opt/oscsa_gateway/

Copied install scripts
Copied OSCSA image
Starting configuration script
Enter the path for OSCSA data storage
/oscsa/data
WARNING: OSCSA MAY NOT RUN PROPERLY, LOW DISK SPACE, PROVISION ADDITIONAL STORAGE SPACE FOR VOLUME /oscsa/data, FREESPACE 62 GiB, RECOMMENDED MINIMUM SPACE FOR CACHE: 300 GiB,
TOTAL RECOMMENDED MINIMUM SPACE FOR VOLUME /oscsa/data: 300 GiB.
PROVISION A VOLUME DEDICATED TO OSCSA WITH ADDITIONAL DISK SPACE.

TO PROCEED, TYPE "CONFIRM" OR PRESS ENTER TO STOP THE INSTALL.
CONFIRM
Enter the path for OSCSA metadata storage
/oscsa/metadata
WARNING: OSCSA MAY NOT RUN PROPERLY, LOW DISK SPACE, PROVISION ADDITIONAL STORAGE SPACE FOR VOLUME /oscsa/metadata, FREESPACE 62 GiB, RECOMMENDED MINIMUM SPACE FOR METADATA: 80 GiB,
TOTAL RECOMMENDED MINIMUM SPACE FOR VOLUME /oscsa/metadata: 380 GiB.
PROVISION A VOLUME DEDICATED TO OSCSA WITH ADDITIONAL DISK SPACE.

TO PROCEED, TYPE "CONFIRM" OR PRESS ENTER TO STOP THE INSTALL.
CONFIRM
Enter the path for OSCSA log storage
/oscsa/log
WARNING: OSCSA MAY NOT RUN PROPERLY, LOW DISK SPACE, PROVISION ADDITIONAL STORAGE SPACE FOR VOLUME /oscsa/log, FREESPACE 62 GiB, RECOMMENDED MINIMUM SPACE FOR LOG: 20 GiB,
TOTAL RECOMMENDED MINIMUM SPACE FOR VOLUME /oscsa/log: 400 GiB.
PROVISION A VOLUME DEDICATED TO OSCSA WITH ADDITIONAL DISK SPACE.

TO PROCEED, TYPE "CONFIRM" OR PRESS ENTER TO STOP THE INSTALL.
COFIRM
Invalid input please type CONFIRM to proceed or press ENTER to stop the install.
CONFIRM
Enter the docker network mode (host or bridge), Hit <Enter> for the default bridge mode.

Enter the host port to use for the Administrative Web Interface. Hit <Enter> to use dynamic port mapping
32771
Enter the host port to use for NFS access. Hit <Enter> to use dynamic port mapping
32772
Enter the host port to use for the optional HTTP REST service. Hit <Enter> to use dynamic port mapping
32773
Writing configuration
Importing image
d0c367ad7015: Loading layer [==================================================>] 233.7MB/233.7MB
...
a891fa34560d: Loading layer [==================================================>] 2.048kB/2.048kB
Loaded image: oscsa_gw:1.3.0
The image oraclelinux:7.3 already exists, renaming the old one with ID sha256:d42df3cd808c9b697c9fdd36909c13cd8657604fe1ef9f1a145ec45e788228e5 to empty string
Loaded image: oraclelinux:7.3
Please run 'oscsa up' to start the software appliance

*************************************
For additional details, please see (/opt/oscsa_gateway/OSCSA_GATEWAY_README.txt) file
*************************************
Appliance Start
Now the Oracle Storage Cloud Software Appliance can be started. A server reboot is not problem. The docker image will be started after server startup automatically.
# oscsa up
Creating OSCSA Volume with args -v /oscsa/data:/usr/share/oracle/ -v /oscsa/metadata:/usr/share/oracle/system/ -v /oscsa/log:/var/log/gateway
Checking available space on host volumes
WARNING: OSCSA MAY NOT RUN PROPERLY, LOW DISK SPACE, PROVISION ADDITIONAL STORAGE SPACE FOR VOLUME /dev/mapper/ol-root, FREESPACE 62 GiB, RECOMMENDED MINIMUM SPACE FOR LOG: 10 GiB,
TOTAL RECOMMENDED MINIMUM SPACE FOR VOLUME /dev/mapper/ol-root: 200 GiB.
PROVISION A VOLUME DEDICATED TO OSCSA WITH ADDITIONAL DISK SPACE.

WARNING: OSCSA MAY NOT RUN PROPERLY, LOW DISK SPACE, PROVISION ADDITIONAL STORAGE SPACE FOR VOLUME /dev/mapper/ol-root, FREESPACE 62 GiB, RECOMMENDED MINIMUM SPACE FOR CACHE: 150 GiB,
TOTAL RECOMMENDED MINIMUM SPACE FOR VOLUME /dev/mapper/ol-root: 200 GiB.
PROVISION A VOLUME DEDICATED TO OSCSA WITH ADDITIONAL DISK SPACE.

WARNING: OSCSA MAY NOT RUN PROPERLY, LOW DISK SPACE, PROVISION ADDITIONAL STORAGE SPACE FOR VOLUME /dev/mapper/ol-root, FREESPACE 62 GiB, RECOMMENDED MINIMUM SPACE FOR METADATA: 40 GiB,
TOTAL RECOMMENDED MINIMUM SPACE FOR VOLUME /dev/mapper/ol-root: 200 GiB.
PROVISION A VOLUME DEDICATED TO OSCSA WITH ADDITIONAL DISK SPACE.

Applying configuration file to container
Starting OSCSA [oscsa_gw:1.3.0]
Management Console: https://breitenbach.martinberger.local:32771
If you have already configured an OSCSA FileSystem via the Management Console,
you can access the NFS share using the following port.

NFS Port: 32772

Example: mount -t nfs -o vers=4,port=32772 breitenbach.martinberger.local:/<OSCSA FileSystem name> /local_mount_point
Configure a OSCSA FileSystem in the Appliance Web Interface
In this step, the OSCSA will be connected to the Oracle Cloud. At the moment, no <OSCSA FileSystem name> is configured. An OSCSA filesystem is like a namespace containing a set of data. Now we can log in into the Appliance Web Interface to create our first Object Storage filesystem. URL for the interface is https://<servername>:<port>. The port for the interface was set during the installation process.
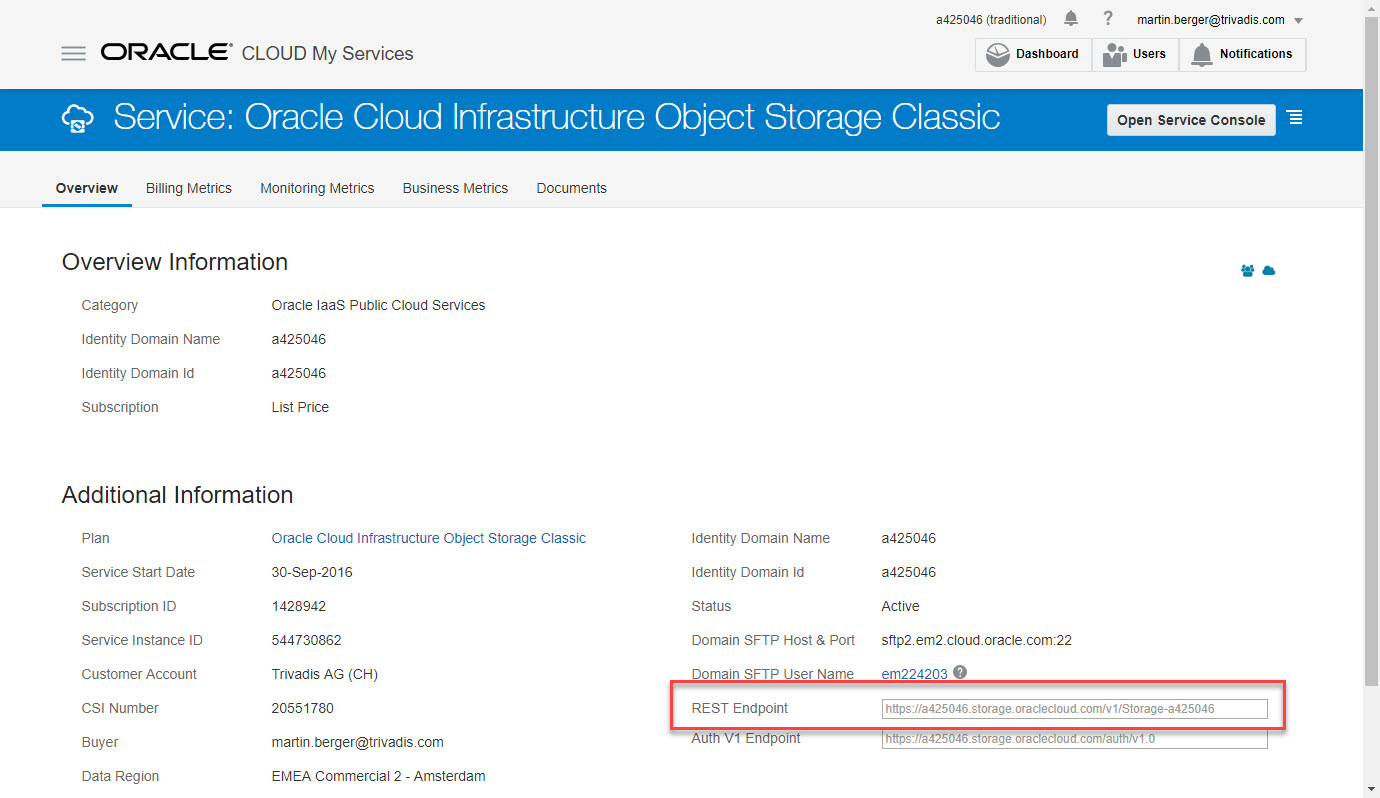
For the connection to the cloud, you need to know your Identity Domain, Username, Password and REST Storage Endpoint URL. The FileSystem name will be reused later for the NFS mount.
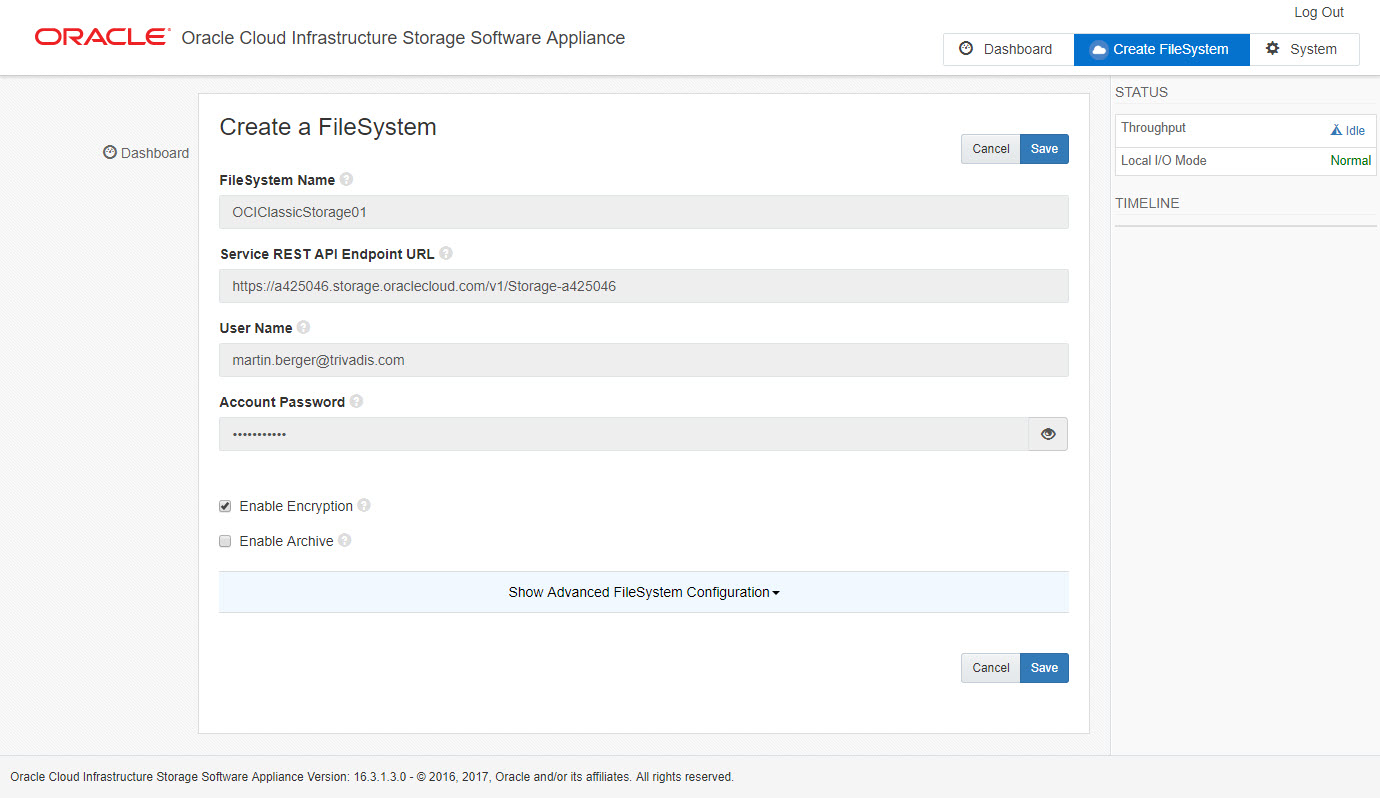
Create a FileSystem called OCIClassicStorage01

Enter Domain, Username, Password and REST Storage Endpoint URL. Below this screenshot you can see where you find the URL in your Traditional Cloud Account.
Here you can see the REST URL.
Click on Validate
If the account informations are verified, you are able to enable compression and encryption. I have enable encryption here. Click Save.
The OSCSA storage is now ready to synchronize with the cloud. Click Connect.
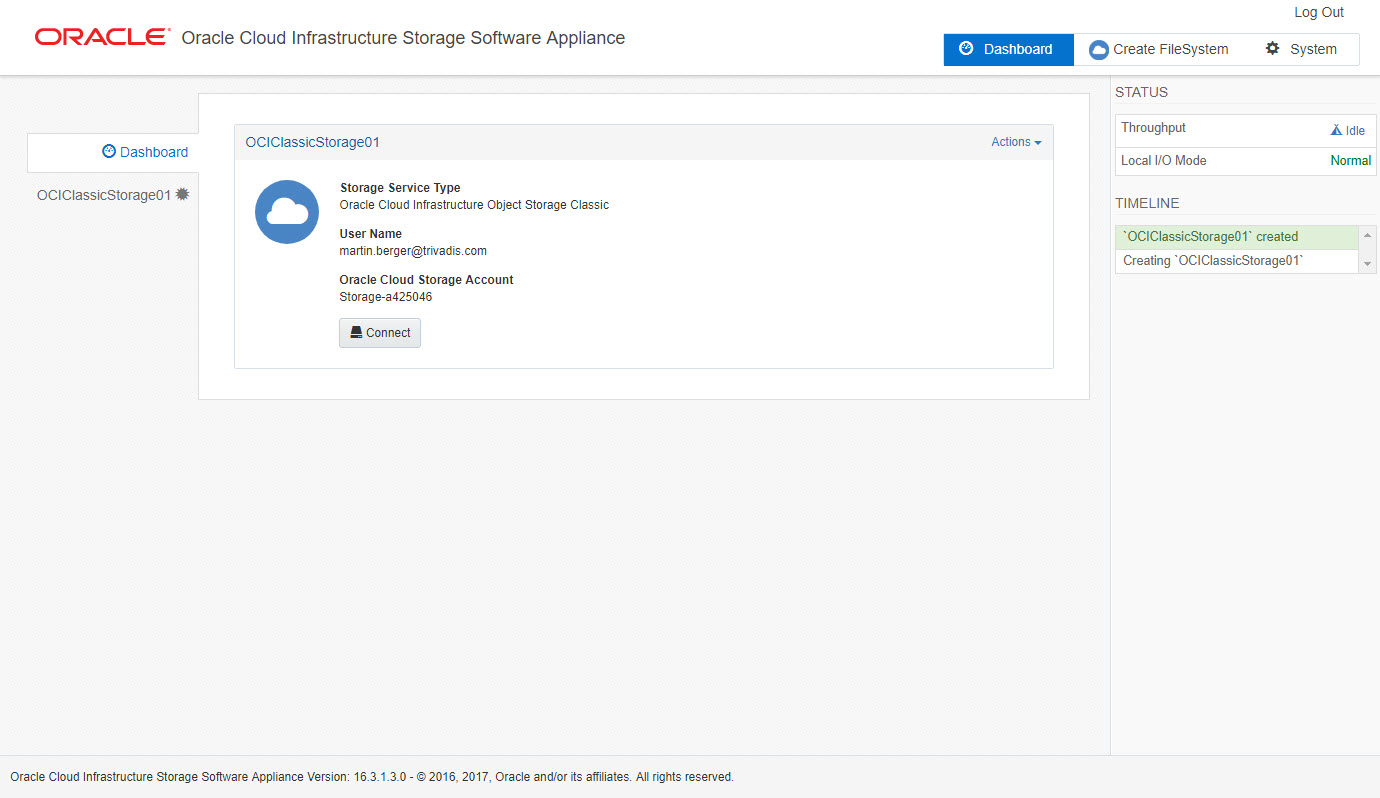
Now you can see the the connection between the Oracle Storage Cloud Software Appliance and the Oracle Cloud Infrastructure Object Storage Service is ready.

In the Traditonal Cloud Account in the Storage Classic dashboard is a new object storage filesystem available.

Connect the Database Server to the Oracle Storage Cloud Software Appliance
Let’s connect the database server to the OSCSA to store data in the Object Storage Service. First we check again on the OSCSA server if the service is running.
# oscsa info
Management Console: https://breitenbach.martinberger.local:32771
If you have already configured an OSCSA FileSystem via the Management Console,
you can access the NFS share using the following port.
On the database server a new mountpoint will be created.
# mkdir /mnt/oscsa
We mount the OSCSA with NFS v4 to the local server. This entry can be added later to autofs or whatever you use to automatically mount an NFS filesystem. Permission of the mountpoint is drwxrwxrwx – so everybody can write into it at the moment.
# mount -t nfs -o vers=4,port=32772 breitenbach.martinberger.local:/OCIClassicStorage01 /mnt/oscsa
Check.
# df -m | grep oscsa
breitenbach.martinberger.local:/OCIClassicStorage01 52428800 1 52428800 1% /mnt/oscsa
Execute an Oracle RMAN Backup to the Cloud
A new subdirectory on the NFS mountpoint will be created.
# mkdir -p /mnt/oscsa/backup/JSF01
Start Oracle Recovery Manager RMAN database backup.
$ rman target=/

RMAN> BACKUP AS BACKUPSET DATABASE PLUS ARCHIVELOG FORMAT '/mnt/oscsa/backup/JSF01/backupsetJSF01%U.bkp';
The backup files are created locally in the specified mountpoint directory.
$ ll
total 0
drwxr-xr-x. 2 oracle oinstall 0 Nov 8 15:06 .
drwxr-xr-x. 2 oracle oinstall 0 Nov 8 09:46 ..
-rw-r-----. 1 oracle oinstall 87519744 Nov 8 15:05 backupsetJSF01.bkp
-rw-r-----. 1 oracle oinstall 207000576 Nov 8 10:11 backupsetJSF0178sj1s75_1_1.bkp
-rw-r-----. 1 oracle oinstall 134822912 Nov 8 10:11 backupsetJSF0179sj1s76_1_1.bkp
-rw-r-----. 1 oracle oinstall 6382592 Nov 8 10:11 backupsetJSF017asj1s77_1_1.bkp
-rw-r-----. 1 oracle oinstall 10240 Nov 8 10:11 backupsetJSF017esj1s7d_1_1.bkp
-rw-r-----. 1 oracle oinstall 87186432 Nov 8 15:06 backupsetJSF017isj2dg5_1_1.bkp
-rw-r-----. 1 oracle oinstall 84397568 Nov 8 15:06 backupsetJSF017jsj2dg6_1_1.bkp
-rw-r-----. 1 oracle oinstall 7680 Nov 8 15:06 backupsetJSF017nsj2dgd_1_1.bkp
-rw-r-----. 1 oracle oinstall 18661376 Nov 8 09:54 controlfileJSF01.ctl
At the moment where the backup sets are arrived on the mountpoint, the OSCSA begins to encrypt (this was my selections during filesystem creation) and transfer them into the Oracle Cloud. This is visible in the Appliance Web Interface.

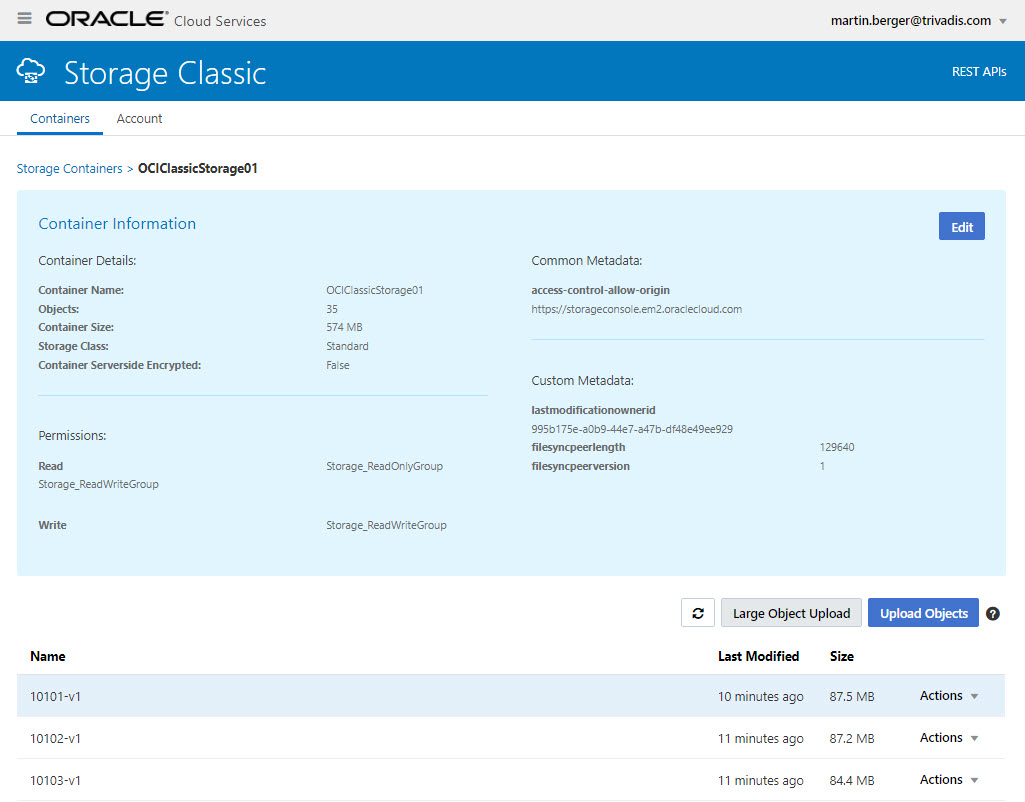
Now the files are uploaded into the Oracle Cloud. This can be verified in the Traditional Cloud Account in the specific filesystem. The files are encrypted and have file names like 10101-v1, 10103-v1 etc.
Anything else?
Sure, this was just a basic overview how to configure the on-premises Oracle Storage Cloud Software Appliance. There are many more features like retrieve data, cloud access via command line, preserve filesystem cache, create directory permissions, set user permissons, monitor the appliance, backup the appliance, encryption key handling, use the archive storage and so on which are worth to spend more time for investigation in the future.
Summary
The Oracle Storage Cloud Software Appliance is a nice piece of software which helps you to use the Oracle Cloud Infrastructure Object Storage Service. The appliance is easy to install and configure, local encryption is possible and the documentation is very good. Database Backups and Database Export a perfect candidates for this service. The price is hot, $0.0204 per GB for the first TB, and $0.0201 per GB for the next 49TB.
Thumbs up!